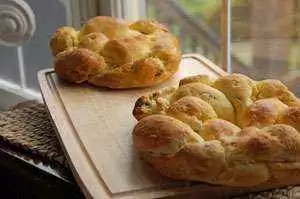
Although associated with important Jewish holidays like Rosh Hashanah (the Jewish New Year), challah is not only a culturally significant bread at these times of year, but also a delicious and impressive bread to serve at your table any time.
No matter what your reason for making this delicious bread, celebrate that this quick, easy (yes, I said easy!) and very impressive recipe is at your gluten-free fingertips any time you feel like looking forward to a sweeter day.
Celiac.com Sponsor (A12):
All of you who have seen me at gluten-free cooking classes or demonstrations making yeast breads already know the dirty little secret about gluten-free bread. Shhhh.... don't tell the gluten-eaters! Seriously! It is super quick and shockingly easy to make homemade gluten-free bread! Impress your friends and shock the neighbors with this recipe too: not only is gluten-free challah delicious and super fast, it's almost too beautiful to eat!
 Ingredients:
1/3 cup warm water
1 package rapid rise gluten-free yeast
1 tsp. granulated cane sugar
1 cup vanilla dairy or non-dairy (soy or coconut yogurt) at room temperature
1 tsp. apple cider vinegar
5 large egg yolks at room temperature (slightly mixed)
1/3 cup canola oil
4 Tbs. honey, agave nectar or molasses
4 cups Jules Gluten Free All Purpose Flour*
3 Tbs. + 2 tsp. granulated cane sugar
1 ¼ tsp. kosher salt
½ tsp. baking soda
2 tsp. gluten-free baking powder
1 large egg, mixed
Poppy seeds, sesame seeds, raisins, or other topping or mix-in (optional)
Directions:
Preheat your oven to 200 F, then turn it off; if you have a warming drawer, you may set that to low/moist setting instead. Prepare a baking sheet by lining it with parchment paper.
Bread Machine Method:
Pour all the liquid ingredients into a bread machine set to "Dough" setting. Next add the sugar and honey and then the remaining dry ingredients, save the yeast. Make a well in the top of the dry ingredients and pour the yeast into the center. Close the lid and start the dough cycle. (If you choose to add raisins to the batter, add them during this cycle, after all the other ingredients have been mixed together). Watch to see that the dry ingredients are fully integrated; if they are not completely mixing in, go around the inside of the pan with a rubber spatula to aid in the mixing process. When the mixing portion of the cycle ends, you may remove the dough (don't wait for the gluten “dough” cycle to finish, as it will let the dough sit for 1 or 2 hours after mixing – this is not what you want for this gluten-free dough!).
Stand Mixer Method:
In a small bowl, mix together the warm water, yeast and 1 teaspoon of sugar to proof the yeast; set aside. In the bowl of your stand mixer, add the remaining wet ingredients and mix until combined. Whisk together the dry ingredients in a separate bowl. After 5 minutes of proofing, stir in the yeast-water mixture into the wet ingredients (note: if your yeast isn't bubbling at this point, throw it out and start again with fresh yeast). Gradually stir in the dry ingredients until fully integrated, then mix 2 minutes more on medium speed.
Using either method, once the dough is combined, divide it in half and divide each half into three equally-sized balls. Roll each ball out into a coil or long log on a clean, flat surface dusted lightly with Jules Gluten Free™ All Purpose Flour. Pinch together one end of each coil, wetting them slightly with water to help them join together at the top, then braid them, finishing by connecting them to the top of the other end in order to form a crown, or circular shape. You will then have one round challah loaf. Gently transfer it to the parchment-lined baking sheet. Repeat for the second set of three balls. In the alternative, you can simply divide the dough in half, roll out into a flattened coil, then twist upon itself and join at the ends to form a circular loaf; repeat with the other half of the dough ball.
In a small bowl, mix the extra egg together and brush over each loaf well, coating the entire top surface. Sprinkle the seeds or any toppings at this point, then place the tray (covering the loaves with wax paper sprayed with cooking oil) in a warming drawer set to low heat, or into the preheated oven for approximately 20 - 30 minutes. (Don't expect the bread to rise much at this stage).
Once risen slightly, place the uncovered tray in an oven preheated to 350 F (static) or 325 F (convection) for 20-25 minutes. Remove to cool on a wire rack and cut after slightly cooled.


Recommended Comments