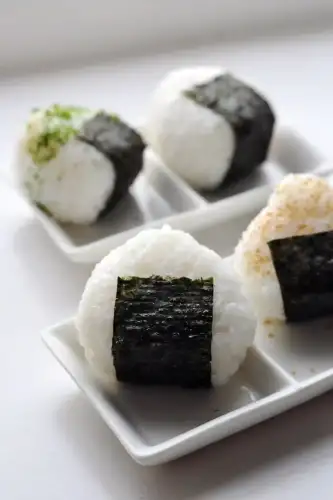
Celiac.com 01/22/2025 - Onigiri, also known as rice balls, has been a cherished part of Japanese cuisine for centuries. First documented in the Heian period (794–1185), onigiri was a convenient way for travelers and soldiers to carry a portable, filling meal. Made from simple ingredients—rice, salt, and various fillings—it symbolizes the essence of Japanese home cooking. Wrapped in a strip of nori (seaweed) for easy handling, onigiri is still a popular snack sold in convenience stores across Japan. Traditionally, fillings like salted salmon and pickled plums (umeboshi) were used for their natural preservative properties, allowing the onigiri to stay fresh longer.
For those following a gluten-free diet, onigiri is a fantastic option since its main ingredients—rice and most traditional fillings—are naturally gluten-free. This recipe provides the perfect balance of authentic flavors and dietary inclusivity, making it an ideal choice for picnics, lunchboxes, or a quick, satisfying snack.
Gluten-Free Onigiri Recipe
Celiac.com Sponsor (A12):
Ingredients (Makes 6-8 rice balls):
For the Rice:
- 3 cups cooked short-grain white rice (sushi rice), slightly cooled
- ½ teaspoon salt
- ¼ cup toasted sesame seeds (optional)
Filling Options:
- Salted Salmon: 1 small fillet of cooked salmon, flaked
- Pickled Plum (Umeboshi): 2-3 umeboshi, pitted and chopped
- Seaweed (Kombu or Nori): ¼ cup cooked and seasoned kombu strips
Additional Ingredients:
- 2 sheets nori (seaweed), cut into strips
- Gluten-free soy sauce or tamari (optional, for brushing or dipping)
Instructions:
Prepare the Rice:
- Cook the short-grain rice according to package instructions. Allow it to cool slightly, so it’s warm but not hot to the touch.
- Gently mix in the salt, and, if desired, the toasted sesame seeds for extra flavor.
Prepare the Fillings:
- For salted salmon, season and cook the fillet (grilled or pan-seared works well). Flake it into small pieces.
- For pickled plums, remove the pits and chop the umeboshi into small bits.
- For seaweed, use pre-cooked kombu strips or lightly season nori with a gluten-free soy sauce glaze and cut into thin strips.
Shape the Onigiri:
- Wet your hands with water and sprinkle them with a little salt to prevent sticking.
- Take about ⅓ cup of rice in your hands and flatten it slightly. Place a teaspoon of your chosen filling in the center.
- Fold the rice around the filling and shape it into a triangle or ball by pressing gently with your hands. Repeat with the remaining rice and fillings.
Wrap with Nori:
- Wrap each onigiri with a strip of nori for easy handling. The nori should stick to the rice naturally, but if needed, you can lightly moisten the edges.
Serve and Enjoy:
- Arrange the onigiri on a plate. If desired, brush them lightly with gluten-free soy sauce or tamari for an extra umami kick. Serve immediately or wrap in plastic wrap for later consumption.
Tips for Perfect Onigiri
- Rice Texture: Use short-grain rice for the right stickiness; long-grain varieties won’t hold their shape.
- Salted Hands: Slightly salty hands while shaping add flavor and act as a preservative.
- Variations: Try other gluten-free fillings like avocado, grilled chicken, or shredded vegetables for a modern twist.
This gluten-free onigiri recipe is a delightful way to explore Japanese cuisine while staying mindful of dietary restrictions. Its versatility, simplicity, and portability make it a favorite for all occasions. Whether you enjoy them fresh or pack them for a journey, these rice balls offer a taste of tradition with every bite!


Recommended Comments
There are no comments to display.
Create an account or sign in to comment
You need to be a member in order to leave a comment
Create an account
Sign up for a new account in our community. It's easy!
Register a new accountSign in
Already have an account? Sign in here.
Sign In Now